Howto: Getting CUPs working on OpenWRT guide

Introduction
This has been so painful.
I've spent hours trying to get this working with little info on google searches for when things have gone wrong.
Fortunately, I have got it working! Hopefully this guide will be of some help if you're trying to get CUPs working on your wireless router.
What is CUPs? printing....from your wireless router???
CUPs is a linux print server. Using a wireless router, such as the TP-LINK WR1043ND, we're able to install a new open source firmware such as OpenWrt. Furthermore we can install different packages, such as CUPs, allowing us to do a lot more than the manufacturer originally intended.
Issues upon issues...
My first attempt at this saw many different issues. If you really want to see what I was struggling with, I have a forum post about them here: https://forum.openwrt.org/viewtopic.php?id=39990
A fresh start
It was time I started again from scratch. I decided I would try out a bleeding edge build and I am now running OpenWrt Attitude Adjustment 12.09-beta, LuCI Trunk (trunk+svn9220). My reason for this is the off chance a package I had installed may have been having issues with "stable" which hasn't been updated in almost a year (http://downloads.openwrt.org/backfire/10.03.1/ar71xx/ shows Dec 2011).
Equipment
- TP-Link WR1043ND Wireless router
- 10 port powered USB hub (overkill but I got it cheap. The WR1043ND doesn't do a good job providing power to USB devices, so without a powered hub, you may see strange issues, especially with USB 3G modems.)
- 2GB USB stick (This will be used for spooling for CUPs)
- Brother HL5240 Laser Printer
- Canon MX310 Multifunction Printer
Installation
1. Install OpenWRT on your wireless router.
There are enough guides online on this, and I won't cover it here. All I'm going to say is if you're currently running OpenWRT and you want to try another version of it, login to your router via the web, then System > Backup / Flash Firmware > Flash new firmware image.
Normally you would download a sysupgrade .bin but I used a factory.bin. This is because I was going between different versions of OpenWRT and I'm not sure if a sysupgrade version may have caused issues. I also unticked "keep settings" since I wanted it back to default config.
Flash the firmware then re-setup any of your basic config (passwords, ip address, wireless SSID etc).
2. Prepare your router for CUPs
At this point, you've probably already seen the CUPs guide on the OpenWRT site and are probably stuck on it. Hopefully the below steps will be of some help.
For me running ATTITUDE ADJUSTMENT (12.09-beta, r33312), all the required usb packages were already installed. You can check what packages are installed by entering opkg list-installed, or via web by going System > Software.
Basically before you install CUPs you need:
kmod-usb-core
kmod-usb-ohci
libusb
I think you may also need kmod-usb2, and hotplug2. I have them installed anyway.
CUPs also needs:
zlib, libpthread, libpng, libjpeg, libstdcpp, and if you're using a canon printer, you may need cups-bjnp. Note, for all of the above, except cups-bjnp, they may be dependencies for CUPs and I didn't have to manually install any of them. I have a feeling they all just installed when I installed CUPs.
To install:
opkg update
opkg install kmod-usb-core kmod-usb-ohci libusb kmod-usb2 hotplug2
Make sure you don't have kmod-usb-printer installed or running.
Why? because CUPs talks directly to the printers and kmod-use-printer is another layer which is used by other apps such as p910nd to communicate with the printer. This is also the reason why you won't see lp0 under /dev.
Right! Prerequisites are out of the way, lets actually install CUPs!
3. Installing CUPs
From the command line: opkg install cups
That was probably the easiest step of the lot.
Now that CUPs is installed, there's a bit of config you need to do before it will probably work. As detailed on a forum post on www.newren.com.au, you need to do the following:
Use a text editor (e.g. vi) to open /etc/cups/cupsd.conf, so:
root@OpenWrt:/# vi /etc/cups/cupsd.conf
changeUser NobodyGroup Nobody
to:User rootGroup root
And change AuthClass to AuthClass Anonymous.
Remember to change allowed network to your network, otherwise you won’t be able to find the printer. E.G:
 Order Deny,Allow
 Allow From 127.0.0.1
 Allow From 192.168.0.0/24
Change "Allow From 192.168.0.0/24" to the IP subnet you're using.
Use ":wq" to save the file and quit. Personally I prefer using the text editor nano, so I did opkg install nano, and then nano /etc/cups/cupsd.conf, edited the file, then ctrl + x, Y, enter.
Then, you need to change the permissions on /usr/lib/cups/backend/usb to 700.
To do this, enter: chmod 700 /usr/lib/cups/backend/usb
This changes the behavior of cups, which normally tries to execute the backend through a user account other than root. This forces the backend to run as root from cups.
Okay! Got this far? Try entering the following command:
root@OpenWrt:/# /usr/lib/cups/backend/usb
You should hopefully see something like:
DEBUG: list_devices
 DEBUG: usb_find_busses=1
 DEBUG: usb_find_devices=7
 direct usb://Canon/MX310%20series?serial=406F4E&interface=1 "Canon MX310 series" "Canon MX310 series" "MFG:Canon;CMD:BJL,BJRaster3,BSCCe,PLI;SOJ:TXT01;MDL:MX310series;CLS:PRINTER;DES:Canon MX310 series;VER:1.030;STA:10;HRI:EU;MSI:E3;" ""
Yus! This is a good sign! This means that CUPs is talking correctly with your printers. Get an error? I originally had:
root@OpenWrt:/usr/lib/cups/backend# /usr/lib/cups/backend/usb
/usr/lib/cups/backend/usb: can't load library 'libusb-0.1.so.4'
Fix:
root@OpenWrt:/usr/lib# opkg updateDownloading http://downloads.openwrt.org/backfire/10.03.1/ar71xx/packages/Packages.gz.root@OpenWrt:/usr/lib# opkg install libusb
4. Accessing CUPs
To access cups, enter http://ip-address-of-your-router:631/admin, so for me it's http://192.168.0.1:631/admin
You may be requested to login, just use your root account, unless you've created another account.
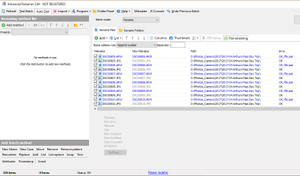
Next go Admin > Add Printer, and you should be presented with the following screen:

As you can see, CUPs HAS picked up both my printers correctly, and I'm able to go through each following step in setting them up. What if CUPs doesn't show anything there for you?
Try the following, which was posted on http://9m2tpt.blogspot.co.nz/2012/01/cups-hl-2140-usb-printer-wzr-hp-g300nh.html:
To add the printer, just go to http://your-router-ip-address:631. Go to administration, add printer, select the AppSocket/HP JetDirect option. Remember the output from /usr/lib/cups/backend/usb? Use the URI there and paste it into the "Connection" field. Example, for my printer, the URI returned by the backend command is: usb://Brother/HL-2140%20series?serial=F9J555425
Okay! So if your printers DID show up and you didn't have to do the paragraph above, select your printer and click next. There's two ways you can install your printer. You can either install it as RAW, or you can install a PPD file for your printer. Without going into detail, I believe you're better off installing using a ppd file. If my case with the Brother HL5240, I was able to get the ppd file from: http://www.openprinting.org/printer/Brother/Brother-HL-5240
Go through all the steps and you should have your printer sitting as idle under printers. At this point, you should be able to add your printer on a client and try printing a test page.
Note: Due to limited functionality of CUPs on the router, you can't print a test page from within CUPs on the device.
5. Configuring a Windows 7 Client for the CUPs Printer
1. Click Start, and type add a printer.
2. Click add a network, wireless, or Bluetooth printer.
3. Click "The printer that I want isn't listed."

At this point, hopefully a test page has printed. Wohoo!!
I spent hours getting to this point. And it's a fantastic feeling having your wireless router act as a print server. The thing to remember is, it's not over yet....
Configure a USB drive for spooling storage
One issue that we face having a wireless router act as a print server, is that this wasn't its original function, and therefore there are certain constraints that we must get around. 1 is that the router has an extremely small and limited internal memory. With CUPs, when a user sends a job to the printer, the whole file gets transferred across, and needs to be stored, or cached somewhere while the printer gets ready to start printing. Therefore, we need to set up a usb drive for spooling. You may get away with not having to do this step, but you also may have print job issues down the track if you're printing a big file. Chances are you have a spare usb flash drive lying around not being used, so why not just do the extra step.
For this step, there are other guides online for configuring a flash drive for OpenWrt, not to mention the OpenWrt usb storage page. There's quite a good guide on it here. For me though, I have a linux Mint laptop, so I just plugged in my spare usb drive, apt-get installed gparted, and then configured 90% of the flash drive with ext4, and the last 10% as SWAP. I also changed the permissions on the flash drive and used permissions you probably shouldn't use by doing "sudo chmod 777 /mnt/flash drive" which basically gives all users read write and execute permissions. For me I don't think there will be any issues with this.
Following the guides above, I did:
opkg updateopkg install kmod-usb-storage kmod-fs-ext4 block-mount
At this point there is two ways you could mount your storage, either using the CLI/SSH or via the gui web page. Personally doing it with the web page, as I find it easier.
If you don't have the tab "Mount Points" it's probably because you don't have all the right packages installed. It didn't appear for me till I added "block-mount".

Configure CUPs to use your USB device for print jobs
Time to re-edit your CUPs config. Either use VI or your text editor of choice and edit your cupsd.conf file:
nano /etc/cups/cupsd.conf
Change:
RequestRoot /var/cups
 TempDir /var/cups
I changed both to/usb/cups/ since as you can see in the above screen cap I mounted my usb drive as /usb
You probably should restart CUPs now.Do this by:root@OpenWrt:~# /etc/init.d/cupsd restart
Also if at some point you've restarted your device and CUPs hasn't started, do either of the following:
enter /etc/init.d/cupsd enable or alternatively in the gui go toSystem > Started, and make sure cupsd has enabled beside it.
Speaking of cleaning up
Could be a good point to get rid of those default printers you're not using.
Firstly stop the cups service: /etc/init.d/cupsd stop
I just commented out the printers doing nano /etc/cups/printers.conf and putting a # beside them. Syslog will throw up a couple of errors on start up but that shouldn't matter. Alternatively just delete everything for the two defaults.
Then do:/etc/init.d/cupsd start
Adding the printers on a Mac Client.
I had issues adding the printers through the default mac config, but then suddenly remembered that Macs actually run a local version of CUPs so I just added them by going into the web browser: http://127.0.0.1:631 and adding the printers in there! Works great!
Conclusion
Hopefully you made it this far, and have a working version of CUPs on your wireless router! Congrats!
Got an issue that you've been stuck in for hours? Always try doing some debug, E.g. via the web interface, go Status > System Log, or Kernel Log. Both of which can be pretty helpful.
As a last resort, if you've really stuffed things up, a fresh install might be the way to go. Fixed things for me!
Got any questions? feel free to write below.
Other Resources
Quite a good guide if you're wanting to use p910nd as your print server:
USB flash drive on OpenWRT 10.03 Backfire HOWTO:
Other CUPs on OpenWrt install guides around the web:
- http://9m2tpt.blogspot.co.nz/2012/01/cups-hl-2140-usb-printer-wzr-hp-g300nh.html
- www.newren.com.au/ibbs/forum.php?mod=viewthread&tid=392
Another all in one guide which covers pretty much everything except a print server:


Comments