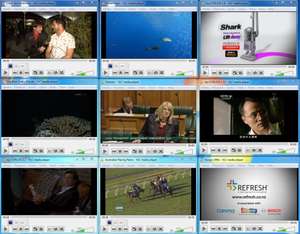
IPTV: How to stream all Freeview Channels on to your network

Introduction
First of all I can't help but recommend you read the Angry Technician's post How to stream EVERY channel from Freeview onto your network as he's written an excellent tutorial on what I'm going to also try and explain below.
I've spent some time fine tuning (huh, get it? cause we're tuning in...oh forget it) my setup based on his tutorial and hopefully it will provide you with some more examples and help in getting TV streaming across your network.
What you will need
1. Some Linux knowledge
You could say this is quite an ambitious project and you'll need to be able to do things like install Linux on a dedicated machine, install tuners, get drivers working etc. If all this is new to you, good luck, and I still recommend you give it a go. Admittedly I got it all working within a couple of hours, and at the time of first setting this up in 2012, I was quite a Linux novice. Through this project, I have acquired a lot of skills and knowledge of Linux, so for me it's been very good.
2. Some networking knowledge
Sweet so you have some Linux knowledge maybe? That's great but this could become quite an intermediate to expert project. It really depends on the network you're plugging the IPTV server into.
I would highly recommend at minimum using a Gigabit Switch. There's quite a lot of ways you could have the traffic flow to clients, and each configuration suits different scenarios. E.G. If you have specific hosts purely for receiving TV, you could simply have a separate VLAN the TV box and clients are connected to. Traffic would then just spam out all connected ports in the VLAN, basically this would be a broadcast network. This probably isn't practical though, and what you would do instead is enable a feature called IGMP Snooping. This will probably be satisfactory enough for small networks, but if you are running the multicast over a Layer 3 network, you will need to have a look at PIM-DM or PIM-SM.
3. At least 1 Terrestrial or Satellite TV tuner
This really comes down to your budget and how many channels you want to be able to stream. Basically you will need at least 1 tuner per frequency for channels you want to receive. Here in Christchurch NZ, we currently have 16 TV channels and 3 Radio stations transmitted over 3 frequencies. This means I only need 3 tuners to be able to stream all channels at once. Effectively 3 tuners.
4. Dedicated PC
This could just be an old 1GHZ pc with 1gb of ram. Nothing fancy, as we're simply sending the received digital data and multicasting the traffic on to the network. A 1Gbit Network card would be recommended though. Make sure you have enough free PCI/PCI-E/USB ports for tuners too.
The box after inserting several NICs and the Tuners
Post OS installation
I won't go into detail with physical installation, nor installing your choice of Linux (I recommend Ubuntu) but once you do have it installed, probably the first thing I'd suggest you do is make sure your tuners are coming up correctly and working.
Simply open a terminal and enter:$ ls /dev/dvb/
Depending on how many tuners you have, you should see adapter0, adaptor1 etc for each tuner. If you don't see any tuners, it's probably time to start googling support for your tuner, but you can also find more log info by typing dmesg. I'm simply suggesting all this as the HVR2210 I have didn't work out of the box for me. If you have this card, I believe my solution was:
cd /lib/firmware/
sudo wget http://www.steventoth.net/linux/hvr22xx/firmwares/4019072/NXP7164-2010-03-10.1.fw

Reboot the machine
Still with me? Lets get started!
Programs to install
- Ubuntu - Or your choice of OS.
- VLC - Possibly not needed, but very helpful for diagnosis
- Vino - VNC Server that comes with Ubuntu
- dvb-apps - A package containing various different tools for dvb cards
- dvblast - Made by the same people as VLC. This is what multicasts all the channels out.
- minisapserver - For creating the channel playlist in VLC.
- udpxy - Converts the RTP multicast streams into unicast HTTP streams. Useful for viewing the TV streams on devices not capable of receiving multicast streams.
Installation
Open a terminal and enter the following:
 sudo -s
 apt update
 apt install dvb-apps minisapserver vlc
Expand if you're new to linux
Apt would probably be one of my favorite things since using linux.Ubuntu/linux comes pre-loaded with a database of resources hosting apps and utilities that you can request to download from without having to manually go to the website, find the download link, wait for it to finish and then install.
Instead you can do above and it will download it and install it for you! There's also a gui "app store" as such called synaptic package manager, and also the ubuntu software center.
Compiling and Installing DVBlast from source
You could also simply add dvblast to the above list above, but at the time I had issues with SD channels (sound not working) which resulted in me needing the current unstable version.
More info is available on the commands below again on another Angry Tech post:
 	sudo apt-get install git
 	git clone git://git.videolan.org/bitstream
 	cd bitstream
 	sudo make install
 	git clone git://git.videolan.org/dvblast
 	cd dvblast
 	sudo make install
DVBlast is now installed so we can now get on to the first step which is scanning your local terrestrial tower.
Configuration
DVB-apps comes with some configs for different terrestrial towers, and you can see if your local one already exists by typing ls /usr/share/dvb/dvb-t/
In my case, my local tower here in Christchurch New Zealand didn't exist, so I just entered "sudo gedit" into a terminal, which opens the gui text editor, and created and saved the following:
  Sugarloaf, Christchurch NZ
 #
 # Channel allocation details for NZ can be found at
 # http://www.rsm.govt.nz/cms/policy-and-planning/current-projects/broadcasting/digital-television-2007-frequency-plan
 #
 # T freq bw fec_hi fec_lo mod transmission-mode guard-interval hierarchy

 # Multiplex DA
 T 562000000 8MHz 3/4 NONE QAM64 8k 1/16 NONE
 # Multiplex DB
 T 578000000 8MHz 3/4 NONE QAM64 8k 1/16 NONE
 # Multiplex DC
 T 594000000 8MHz 3/4 NONE QAM64 8k 1/16 NONE
I had to find out the frequencies used, which wasn't too hard. Just do a google and find out what your local tower is and what frequencies are used.
Once you have your configuration file sorted, we use a program called scan which does just that. It will tell us the all important PIDs (the unique identifiers for each channel) and a lot of other helpful information.
Just run the following command, which will output what it finds into a file called channels.txt
scan /usr/share/dvb/dvb-t/nz-christchurch -u > channels.txt
If you open channels.txt, you will find something similar to the following:
TV ONE:682000000:INVERSION_AUTO:BANDWIDTH_8_MHZ:FEC_3_4:FEC_AUTO:QAM_64:TRANSMISSION_MODE_8K:GUARD_INTERVAL_1_16:HIERARCHY_NONE:280:330:1200
TV2:682000000:INVERSION_AUTO:BANDWIDTH_8_MHZ:FEC_3_4:FEC_AUTO:QAM_64:TRANSMISSION_MODE_8K:GUARD_INTERVAL_1_16:HIERARCHY_NONE:281:331:1201
U:682000000:INVERSION_AUTO:BANDWIDTH_8_MHZ:FEC_3_4:FEC_AUTO:QAM_64:TRANSMISSION_MODE_8K:GUARD_INTERVAL_1_16:HIERARCHY_NONE:282:332:1202
TVNZ 7:682000000:INVERSION_AUTO:BANDWIDTH_8_MHZ:FEC_3_4:FEC_AUTO:QAM_64:TRANSMISSION_MODE_8K:GUARD_INTERVAL_1_16:HIERARCHY_NONE:283:333:1203
TV3:698000000:INVERSION_AUTO:BANDWIDTH_8_MHZ:FEC_3_4:FEC_AUTO:QAM_64:TRANSMISSION_MODE_8K:GUARD_INTERVAL_1_16:HIERARCHY_NONE:450:400:1300
FOUR:698000000:INVERSION_AUTO:BANDWIDTH_8_MHZ:FEC_3_4:FEC_AUTO:QAM_64:TRANSMISSION_MODE_8K:GUARD_INTERVAL_1_16:HIERARCHY_NONE:451:401:1301
TV3 PLUS1:698000000:INVERSION_AUTO:BANDWIDTH_8_MHZ:FEC_3_4:FEC_AUTO:QAM_64:TRANSMISSION_MODE_8K:GUARD_INTERVAL_1_16:HIERARCHY_NONE:452:402:1302
C4:698000000:INVERSION_AUTO:BANDWIDTH_8_MHZ:FEC_3_4:FEC_AUTO:QAM_64:TRANSMISSION_MODE_8K:GUARD_INTERVAL_1_
The only thing we're really interested in is the Channel, the frequency, and the PID. These are the first and last values, so as an example with the first one, the channel is TV ONE, the frequency is 682MHZ, and the PID is 1200.
What you now need to do, is make a config file for each frequency which will then be used for each tuner. So if your local tower has 3 frequencies, you will need 3 config files, and 3 tuners.
I'd suggest making a folder in your home directory called dvb, which you store each config file in.
Below are my 3 config files.
/home/localadmin/M1.cfg

;TV1
239.255.1.1:5004    1   1200
[ff08::1]:5004@[2001:17:17::1]	    1   1200
;TV2
239.255.1.2:5004    1   1201
[ff08::2]:5004@[2001:17:17::1]      1	1201
;TVNZU
239.255.1.6:5004    1   1202
[ff08::6]:5004@[2001:17:17::1]      1   1202
;TVONE+1
239.255.1.7:5004    1   1205
[ff08::7]:5004@[2001:17:17::1]	    1	1205
To view the other two, click to expand
/home/localadmin/M2.cfg

;TV3
239.255.1.3:5004    1   1300
[ff08::3]:5004@[2001:17:17::1]      1   1300
239.255.1.33:5004/mtu=2000 1 1300
;FOUR
239.255.1.4:5004    1   1301
[ff08::4]:5004@[2001:17:17::1]      1   1301
;TV3PLUS1
239.255.1.5:5004    1   1302
[ff08::5]:5004@[2001:17:17::1]      1   1302
;C4
239.255.1.8:5004    1   1303
[ff08::8]:5004@[2001:17:17::1]      1   1303
/home/localadmin/M3.cfg

;PRIME
239.255.1.9:5004     1    1404
[ff08::9]:5004@[2001:17:17::1]       1    1404
;Maori TV
239.255.1.10:5004    1    1400
[ff08::10]:5004@[2001:17:17::1]      1    1400
;Parliament TV
239.255.1.11:5004    1    1401
[ff08::11]:5004@[2001:17:17::1]      1    1401
;Trackside
239.255.1.12:5004    1    1402
[ff08::12]:5004@[2001:17:17::1]      1    1402
;ChineseTV
239.255.1.13:5004    1    1403
[ff08::13]:5004@[2001:17:17::1]      1    1403
;TV9
239.255.1.14:5004    1    1413
[ff08::14]:5004@[2001:17:17::1]      1    1413
;TV33
239.255.1.15:5004    1    1405
[ff08::15]:5004@[2001:17:17::1]      1    1405
;ChoiceTV
239.255.1.16:5004    1    1407
[ff08::16]:5004@[2001:17:17::1]      1    1407
;BaseFM
239.255.1.20:5004    1    2002
[ff08::20]:5004@[2001:17:17::1]      1    2002
;RadioNZ National
239.255.1.21:5004    1    2000
[ff08::21]:5004@[2001:17:17::1]      1    2000
;RadioNZ Concert
239.255.1.22:5004    1    2001
[ff08::22]:5004@[2001:17:17::1]      1    2001
What's this doing? the semicolon is just specifying a comment purely in this case just to help you identify the channel. Next line in the multicast address chosen:port chosen. 1 sets the stream to always be on, followed by the unique channel PID.
IPv6
If you looked closely you will notice I'm also doing IPv6. IPv6 addresses must be specified in brackets due to using semicolons (which would otherwise be followed by a port). As I mentioned earlier, this machine has several network cards in it. I then have the IPv6 address specified that I want the IPv6 multicast to send out of. Otherwise the stream will default to eth0. This is specific to where this box is used and your set up will probably be quite different.
Note: A route in the Linux routing table could have also been used to specify the out going network interface. This is what I had set up before knowing that I could use DVBlast specifically.
Now that the config files are done, it's time to actually start the streams.
Continuing with my example, put the following 3 commands in separate terminal windows:
For tuner 0 (TVNZ Frequency):
 $ dvblast -a 0 -c /home/localadmin/dvb/M1.cfg -f 578000000 -m qam_64 -b 8 -e
For tuner 1 PRIME/KORDIA Frequency):
 $ dvblast -a 1 -c /home/localadmin/dvb/M3.cfg -f 594000000 -m qam_64 -b 8 -e
For tuner 2 (Mediaworks Frequency):
 $ dvblast -a 2 -c /home/localadmin/dvb/M2.cfg -f 562000000 -m qam_64 -b 8 -e
Here’s what each parameter does:
 -a n tells dvblast to use tuner number n for this multiplex. Obviously, you can’t use each tuner more than one at any one time. Numbering starts at 0, not 1.
 -c nameoffile.cfg tells dvblast to use the config file you just write. It doesn’t matter where you save it.
 -f 000000000 is where you specify the frequency for this multiplex.
 -m qam_x the  modulation type for this multiplex. And then…
 -b n the bandwidth for this multiplex.
 -e Finally, -e tells dvblast to also stream the EPG data.
If you wanted to do them all in 1 terminal, just put "&" on the end of the command, enter, then the next dvblast instance.
Now you should be able to open VLC and type in each multicast address to view each stream (provided you have a route on your host [and the sever] to the multicast range.
SAP configuration
SAP allows you to simply pick the channels from a nice friendly list of channel names in vlc playlist. All you need to do is create a config file for it like below, and save it to /home/localadmin/dvb/sap.cfg
It looks like SAP announcements was implemented in one of the latest versions of DVBlast, so below is for historical reference.
EXPAND - click to expand config
 # sap.cfg - Configuration file of the mini SAP server

 	# Global miniSAPserver options
 	[global]

 	# Number of seconds between announces. 5 is default. Internet announces better use 30.
 	sap_delay=5

 	# The network interface on which to stream.
 	#interface=eth2

 	[program]
 	type=rtp
 	name=TV1
 	user=localadmin
 	machine=tvserver
	site=mattie47.com
 	address=239.255.1.1
 	port=5004

	[program]
	type=rtp
	name=TV1v6
	user=localadmin
 	machine=tvserver
	site=mattie47.com
	address=ff08::1
	port=5004
Conclusion
So, I hope this was helpful in getting multicast IPTV streaming on your network.
Possibly a bit of work, but it's pretty cool to have setup. If you've gone through above, there's also another pretty good IPTV multicast program for Linux called MuMuDVB. I'd recommend also checking it out.


Comments