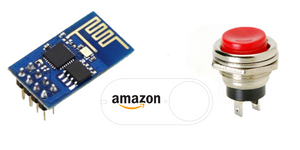
Create an ESP8266 Push button Amazon Dash clone using ESPEasy

I have a problem, which can only be solved with over engineered solutions...
Specifically, I have two desk lamps, as well as a fan with smart WIFI power plugs I normally turn off and on using my phone. The problem is I've stopped charging my phone in my bed room to remove one more distraction before going to bed.
So - how do I now turn off/on the lights/fan in my room if I don't have a conveniently located switch? With an ESP8266 of course!
This guide differs from others on ESPEasy in that it covers actions based on both a short button press, and also a long button press triggering a different action.
In the first part of this guide, I'm going to cover:
- What is ESPEasy and how to compile and install it within Arduino IDE
- Adding in the "long push button" feature plugin
- Adding a simple push button switch to an ESP8266
- Sending actions to an MQTT server
In part 2 I cover what's required to get actions from ESPEasy generated MQTT messages triggering automations within Home Assistant
Introduction
The ESP8266 is a dirt cheap microcontroller (~ $2-3USD from Aliexpress) with WiFi and at least two usable GPIO pins (for things like switches or temperature sensors). It comes in multiple variants with Wikipedia covering a good overview of the range of options. I personally recommend either the NodeMCU or Wemos D1 mini as both can simply be powered and programmed via microUSB, contain a number of usable GPIO pins, and don't require other hurdles like converting power down to 3.3V such as on the ESP-01.
For those new to Ardiunos and the ESP2866 who fear getting stuck in C code and other low level programming languages, there are few good options for new comers which aren't so scary. In this case, ESPEasy is a great starting point.
What is ESPEasy?
ESPEasy is a GUI based operating system for the ESP8266 and its bigger brother the ESP32. It comes with a plethora of features and functionality, offering great versatility around working with all different sorts of sensors and relays.
I really like it because it means I don't have to have multiple different Ardiuno IDE projects for different IoT devices with only specific tasks around the house where I forget the detail of the code of each project. Instead I can use the browser based GUI on each ESP to perform tasks with the different types of sensors connected to each device.
How to compile and install with Arduino IDE
Firstly why?
My conundrum is I want one push button switch to perform multiple tasks. Specifically:
- Short press will trigger the two lights off/on with MQTT
- Long press will trigger the fan off/on with MQTT
If you only want one action i.e. short button press triggering an action, then the default compiled binaries of ESPEasy is more than fine for this purpose. However, if you want a second action based off a long button press, you need a plugin detailed here, which needs to be compiled into ESPEasy.
Regardless of either option, I recommend installing a pre-compiled version of ESPEasy first to ensure its working on your ESP8266.
Compiling
I referred to the ESPEasy documentation here.
Some thoughts after following the docs:
- If you've already got Arduino IDE installed, don't bother re-downloading and installing it. Instead, copy your Ardiuno IDE install directory somewhere outside of "C:/Program Files" to make a portable version. This is because you can then install the required ESPEasy libraries in the new location without impacting any other Arduino IDE projects relying on similar but different version libraries.
- When downloading the firmware from https://github.com/letscontrolit/ESPEasy/releases, it comes with two folders, lib, and source.
- Copy the contents of lib into the libraries folder within the portable copy of Arduino IDE.
- Inside source there is another folder called src. rename the src directory to ESPEasy. Note: The letter case matters!
- Open Arduino IDE from the portable version, and then load ESPEasy.ino from within it
- Try compiling ESPEasy first before trying to upload it to the physical hardware.
Download long button press feature
ESPEasy has a bunch of user-contributed plugins which may or may not be considered stable or tested, and can be downloaded here: https://github.com/enesbcs/ESPEasyPluginPlayground. A number of stable plugins already come with ESPEasy in the previously download source files.
In our case, the long button press feature _P159_Pushbutton.ino has not yet reached the stable state. Download it from github and add it to the "ESPEasy" directory created earlier.
Making the plugin work in ESPEasy.
Unfortunately the plugin docs are not entirely correct and there was a couple things I had to do to make it work.
In line 13 of _P159_Pushbutton.ino, the plugin is currently in the testing phase. This means we need to enable PLUGIN_BUILD_TESTING support in ESPEasy.ino. We also need to define _P159_Pushbutton as part of PLUGIN_BUILD_TESTING in define_plugin_sets.h
In ESPEasy.ino:
// Define globals before plugin sets to allow a personal override of the selected plugins
#include "ESPEasy-Globals.h"
#include "define_plugin_sets.h"
// Plugin helper needs the defined controller sets, thus include after 'define_plugin_sets.h'
#include "_CPlugin_Helper.h"

++//build all the normal stable plugins
++//#define PLUGIN_BUILD_NORMAL
++
++//build all plugins that are in test stadium
++#define PLUGIN_BUILD_TESTING
++
++//build all plugins that still are being developed and are broken or incomplete
++//#define PLUGIN_BUILD_DEV
Technically all we need is #define PLUGIN_BUILD_TESTING however I have the others above commented out for context. We could include all 3 but depending on which ESP8266 you have, it may not have enough flash space.
In define_plugin_sets.h:
// TESTING #####################################
#ifdef PLUGIN_SET_TESTING
#define USES_P045 // MPU6050
#define USES_P047 // I2C_soil_misture
#define USES_P048 // Motoshield_v2

...output omitted...

#define USES_P078 // Eastron Modbus Energy meters
#define USES_P079 // Wemos Motoshield
#define USES_P080 // iButton Sensor DS1990A
#define USES_P081 // Cron
++ #define USES_P159 // Pushbutton
#endif
Re-compile ESPEasy and upload it again to the ESP.
Verify plugin is available
Boot the ESP8266 and verify the Pushbutton plugin in available in the GUI.

If you have a serial monitor enabled while booting the ESP8266, you also see the plugin types loaded:
309 : INFO : Plugins: 47 [Normal] [Testing] (ESP82xx Core 2_4_2, NONOS SDK 2.2.1(cfd48f3), LWIP: 2.0.3)
Configuration
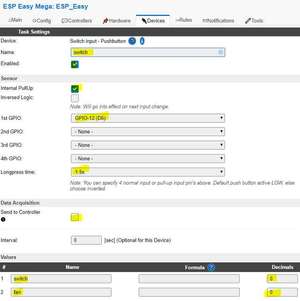
Configuring "Switch input - Pushbutton" in ESPEasy
At this point our plugin is installed and available. Now its time to actually connect a switch, and make it do something.
As previously mentioned, I want my push button to turn my lights on/off via MQTT with a quick button press. If I press the switch for a couple of seconds, instead I want via MQTT to turn my fan off/on.
Notes on above:
- Give the device a name and obviously enable it.
- Because I have the switch connected between the GND pin, and D6 on my ESP, I need to enable "Internal PullUp". When the switch is pressed it detects this through the pin being pulled HIGH.
- Choose how long you want the button to be pressed for a "long press" to be detected.
- You'll note "Send to Controller" is not selected. This is because we will do this using "rules" later on.
- Assuming you only have two actions (short or long), configure two values with a relevant name for each. Also change decimals to 0. When we get the MQTT event, 0 will be OFF, and 1 will be ON.
- Note: I think there's a bug and I had to have #1 configured with
switchas the name. Will explain more in rules section.
- Note: I think there's a bug and I had to have #1 configured with
Are we done? Not yet! Now we need to configure "rules" to make all of the above work.
Configuring Pushbutton Rules
Rules provide further granularity in device configuration, and provide an extra level of "smarts".
You can find more info on the ESPEasy wiki here.
First we need to enable Rules support. Do this by Tools > Advanced > Rules. Make sure "Old Engine" is also enabled (only required if you're running a recent daily release of ESPEasy). Click "Submit" at the bottom to save this.
We now have a new Rules tab. Select this to begin creating our rule.
If you're following the guide, and have configured things exactly as per the screenshot above, the below config will work:
on switch#Shortpress do
event,preparedatalight
endon

on switch#Longpress do
If [switch#fan]=0
taskvalueset,2,2,1
Else
taskvalueset,2,2,0
EndIf
event,preparedatafan
EndOn

on preparedatalight do
Publish %sysname%/switch/lights,[switch#switch]
endon

on preparedatafan do
Publish %sysname%/switch/fan,[switch#fan]
endon
So what's this doing?
- The plugin defines two variable types of shortpress or longpress. We match on these event types and then define what to do with them in the preparedata light/fan sections.
- My understanding is "switch" refers to the global variable of switch (the top "switch" in yellow in previous screenshot), however in practice I noticed the bottom "switch" in yellow also played an effect. If I changed the latter, the above code would not trigger, so I've simply left both as "switch"...
eventtells it to process the specified event- with
switch#Longpresswe use anifstatement to determine whether the fan is currently off (0) and then turn it on with taskvalueset. If it is already on, we turn it off with the alternative taskvalueset.taskvalueset,x,y,zis used to set the value with a specified action. The short press already has off/on toggle defined within ESPEasy and doesn't require this extra logic, but we do require it for the longpress since this isn't a native feature.- x - This is the device number in the list of sensors from the "Devices" tab. If you only have 1 sensor, make this 1.
- y - This is the device sub-value number. In the previous push button screenshot, "Switch" is 1, and "Fan" is 2.
- Z - 1 = ON, 0 = OFF
- Finally we trigger
eventpreparedatafan to fire off an MQTT event with the long press result.
preparedatalight/fan usePublishto fire off the desired MQTT event with the switch's state of 0 or 1. We will configure our MQTT server in the next section.
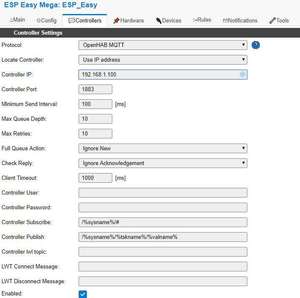
MQTT Configuration
Now that we've configured our rules, we need to define a server to point them at.
In my case I'm running Mosquitto on my Ubuntu Server. This is as simple as:
sudo apt update && sudo apt install -y mosquitto mosquitto-clientsESPEasy MQTT config
Verify MQTT config is working
We can use mosquitto_sub to see all MQTT messages our server may be receiving. To do so, issue the following command:
matt@server:~$ mosquitto_sub -v -t #
/ESP_Easy/status/LWT Connected
-v enables verbose output while -t # subscribes to all MQTT topics.
Finally - let's try our switch!
matt@server:~$ mosquitto_sub -v -t #
/ESP_Easy/status/LWT Connected
ESP_Easy/switch/lights 1
ESP_Easy/switch/lights 0
ESP_Easy/switch/lights 1
ESP_Easy/switch/lights 0
ESP_Easy/switch/fan 1
ESP_Easy/switch/fan 0
ESP_Easy/switch/lights 1
ESP_Easy/switch/lights 0
Great - We now have MQTT events for OFF/ON which can be used with our desired Home Automation tool to pass the events!
Conclusion
In this guide we covered ESPEasy and the flexibility it provides for ESP8266 IoT devices as a simple [over engineered!] wifi push button switch. We looked at how to compile ESPEasy from scratch and also get plugins working within it. Finally, we configured our push button to send MQTT messages based off different short/long press events.
In part two, I explain how to take the MQTT events and configure Automations (actually turning the lights off/on!) within Home Assistant.
I hope you've enjoyed reading this, and you found this guide useful.


Comments