
Home Assistant - Configure Binary Sensor Automations based off MQTT events

This guide follows on from Part 1, where we configured an ESP8266 as an Amazon Dash clone with a push button switch triggering MQTT events when pushed.
Now that we have MQTT messages arriving at our MQTT server, we need to configure our Home Automation tool to perform actions based off these events.
In this guide, I will be using Home Assistant as my smart home tool, and walk through examples for the required configuration. This guide assumes some level of familiarity with Home Assistant.
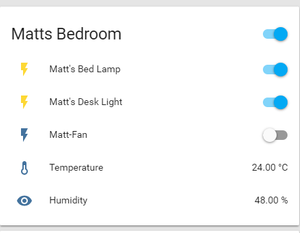
In terms of my devices and what they look like in HA:
Desired goal
- When I push the ESP8266 button, it will turn both lights off or on.
- When I push the ESP8266 button for 1 second or more, it will turn the Fan off/on
From part 1, we currently have the following MQTT messages when the button is pushed:
home/matt/bedroom/lights 0
home/matt/bedroom/lights 1
home/matt/bedroom/fan 1
home/matt/bedroom/fan 0
Now let's connect the glue between this and Home Assistant!
Home Assistant Configuration
Below is my config from configuration.yaml for the 3 smart wifi power plugs I got from Aliexpress:
Lights and Fan
switch:
- platform: broadlink
host: 192.168.1.32
mac: 'XX:XX:XX:XX:XX:XX'
friendly_name: "Matt's Desk Light"
type: sp3
update_interval: 60

- platform: broadlink
host: 192.168.1.26
mac: 'XX:XX:XX:XX:XX:XX'
type: sp3
friendly_name: "Matt's Bed Lamp"
update_interval: 60

- platform: broadlink
host: 192.168.1.25
mac: 'XX:XX:XX:XX:XX:XX'
type: sp3
friendly_name: "Plug#3" #The fan
update_interval: 60
I then tie this configuration together in the GUI with a group:
group:
matt:
name: 'Matts Bedroom'
entities:
- switch.matts_bed_lamp
- switch.matts_desk_light
- switch.plug3
- sensor.matt_bedroom_temperature
- sensor.matt_bedroom_humidity
Creating Binary Sensors for the MQTT events
First we configure our MQTT broker/server. Then we configure a binary sensor for the lights based off the 1 or 0 payload for each topic:
Still in configuration.yaml
mqtt:
broker: 192.168.1.xxx

binary_sensor:
- platform: mqtt
name: matt_lights
state_topic: "home/matt/bedroom/lights"
payload_on: "1"
payload_off: "0"

binary_sensor 2:
- platform: mqtt
name: matt_fan
state_topic: "home/matt/bedroom/fan"
payload_on: "1"
payload_off: "0"
If you reload HASS at this point, you should see two new binary sensors appear in the GUI. Try pressing the button on the ESP8266 and see if the MQTT events trigger the switch in HASS.
Configure Home Assistant Automations
The Automations bring all the variables together to perform the desired actions.
In automations.yaml
- alias: 'ESP Button Lights'
trigger:
- platform: state
entity_id: binary_sensor.matt_lights
to: 'on'
- platform: state
entity_id: binary_sensor.matt_lights
to: 'off'
action:
service: switch.toggle
entity_id:
- switch.matts_bed_lamp
- switch.matts_desk_light

- alias: 'ESP Button Fan'
trigger:
- platform: state
entity_id: binary_sensor.matt_fan
to: 'on'
- platform: state
entity_id: binary_sensor.matt_fan
to: 'off'
action:
service: switch.toggle
entity_id: switch.plug3
Tidying up
Now that we have the automation working, let's remove these extra buttons from being visible in the Home Assistant GUI
In customize.yaml
switch.plug3:
friendly_name: Matt-Fan
binary_sensor.matt_lights:
hidden: true
binary_sensor.matt_fan:
hidden: true
automation.esp_button_fan:
hidden: true
automation.esp_button_lights:
hidden: true
After a final restart of HA, our GUI should be looking good, and ESP button triggering the correct actions!
Conclusion
In this guide, we looked at the required configuration for binary MQTT sensors for Home Assistant. We then used HA Automations to turn specific devices off or on using our binary sensor.
I hope this example configuration has been useful for your own binary sensors and automations within Home Assistant :-)


Comments